Friends, if you are also a UPI (Unified Payments System) user, then you must have used Google Pay at one time or the other. Now along with Google, you must have also heard the name of Google Pay Business. Now although both these products belong to Google but there is a lot of difference between them. The method of using both applications is different and the purpose of using both is also different. Therefore, in this article, we will learn about the Major Differences between Google Pay and Google Pay Business and also know what are the advantages and disadvantages of using these two applications.
Major Difference Between Google Pay And Google Pay Business:
Google Pay and Google Pay Business are two different platforms offered by Google, which target different user segments and use cases. Here are the main differences between them –
Based Upon User Base: Google Pay is primarily designed for individual users to make payments, send money to friends and family, and manage personal finances. It is available for free for all supported devices, within which we can add various payment methods like bank account, credit card, debit card, etc.
On the other hand, Google Pay Business is specifically designed for merchants and businesses to accept payments from customers.
Payment Acceptance: Google Pay allows users to pay businesses both online and in physical stores using their personal Google Pay accounts. In contrast, Google Pay Business enables businesses to accept payments directly into their merchant accounts. It provides a platform for businesses to integrate payment processing solutions and accept payments from customers using Google Pay or other payment methods.
Integration and APIs: Google Pay Business offers a suite of APIs and developer tools that businesses can use to integrate Google Pay functionality into their own applications or websites. This enables businesses to provide a seamless payment experience to their customers. Google Pay, on the other hand, is primarily a consumer-facing app and doesn’t provide APIs for businesses to integrate its functionality.
Business Features: Google Pay Business offers additional features and capabilities designed specifically for businesses. This includes features such as transaction analytics, business insights, and customer engagement tools. It also allows businesses to set up loyalty programs and offer discounts or promotions to their customers. But in Google Pay, you do not get to see any such facility.
Business Verification: Google Pay Business requires businesses to go through a verification process to ensure that they are legitimate entities. This typically involves submitting pertinent business documentation and verifying ownership or authority to operate the business. Google Pay, on the other hand, does not have a verification procedure for individual users. In Google Pay, you can create your UPI Id by simply entering your mobile number and doing transactions with it.
In short, while both Google Pay and Google Pay Business are payment-related services provided by Google, they serve different purposes. Google Pay is designed for personal payments and managing personal finances, whereas Google Pay Business is geared towards businesses and offers features and tools specifically tailored for merchants to accept payments and manage their business operations.
Some Other Differences Between GPay And Google Pay For Business:
Transaction Limit:
You can send or get up to ₹1,00,000 in a day using all UPI apps, like Google Pay. Also, you’re allowed to send money a maximum of 20 times a day using these apps.
For Google Pay for Business, the limits for transactions vary depending on the account type and where you are. Usually, business accounts have higher limits compared to personal accounts.
Eligibility:
The Google Pay for Business app is only in India on Android phones, but it will be available soon for iPhones. Regular Google Pay works on both iPhones and Android phones!
Fee and Charges:
Google Pay:
Google Pay usually doesn’t ask for money when you pay for things in shops, on the internet, or when you send money to your friends. But sometimes there might be charges for certain things:
- In India, if you recharge your mobile using Google Pay, they might add an extra ₹3 fee.
- If you send money to someone in another country, there could be fees from the banks or services that change money from one currency to another.
- Your own bank or the card network, like Visa or Mastercard, might charge you for transactions, especially if they are international. Google itself doesn’t charge for this.
Google Pay for Business:
- For payments made through UPI, Google takes 0.4% of the transaction amount, up to ₹20 in India.
- When customers pay using cards, the fee changes based on the type of card and how much money is being paid. Usually, it’s between 1.2% to 2.6% of the transaction amount, plus ₹3.
- Basic Google Pay for Business accounts don’t have monthly fees. But some special features might have extra costs.
Now we will know how we can create a Google Pay business account on our mobile and for this what steps we have to follow –
How To Create Google Pay Business Account?
Friends, if you are a businessman or you have a local business, then it is very important for you to have a “Google Pay Business” account. There are many benefits of having a Google Pay business account for a merchant. You can download and share by generating your QR Code and apart from this you can get your QR Code by post physically for free. I will tell you further the process of how you can order a free QR code for yourself. Now we will see step by step how to create a Google Pay for Business Account –
- First of all, we have to install the Google Pay for Business app on our mobile phones. After it is installed, you have to open it and click on Get Started.
- After this, it will automatically detect your email ID, which you have to select and click on Continue.
- After this, you will have two options Set Up A Business As Owner and Join A Business As A Staff. Out of which Set Up A Business As Owner means that if you have your own business or shop then you select it and if you work as a staff in a shop or business then you select Join A Business As A Staff do. But we will join here as a business owners.

- After that you have to enter some basic details about your business like – Business Owner Name, Shop Name, Type Of Business etc.

- After this, you have to select the category of your business that under which category your business comes. Then click on Continue.
- Now you have to fill up your business or shop location. In this below, you will also have to add the location of your shop through Google Map. This helps Google in verifying your address.

- After continuing, it will ask you to “Select Your Service Area”, which you can avoid. This is optional and if you want to fill it, you can put in it that in which area you provide your service.
- Now you have to enter your mobile number on which OTP will be sent. You have to verify it by entering the OTP and click on continue.
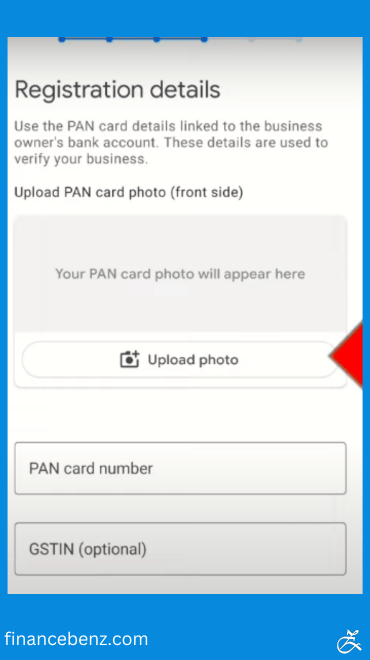
- After this, you have to enter the details of your Pan Card, in which you will also have to upload the photo of your Pan Card.

- Now you have to enter the details of your bank account in which you have to enter your bank account number and IFSC code. After entering details, you have to click on Continue. Now some optional options will appear in front of you, which you can skip.
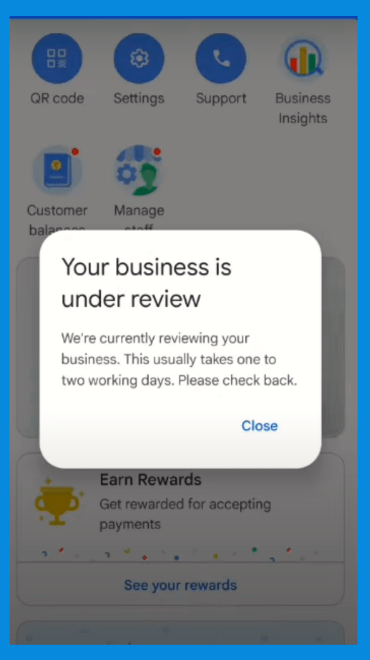
- In the end, a summary of all the details entered by you will appear in front of you, which you have to cross-check once and if all the things are correct then you will click on Submit. After submission, your account will be sent to the Google Pay Business team for review. When you will come to its home page, you will see a pop up named Your Business Under Review

In this popup, you are told that it may take 1 to 2 days to verify your account, but this happens very rarely. After about 15 to 20 minutes, you get a reply. In this, if you have filled up all the details properly, then you get approval very easily in this.
Let us now know how you can order Google Pay QR Code for free for yourself after getting approval?
How to get Google Pay QR Code Kit for free?
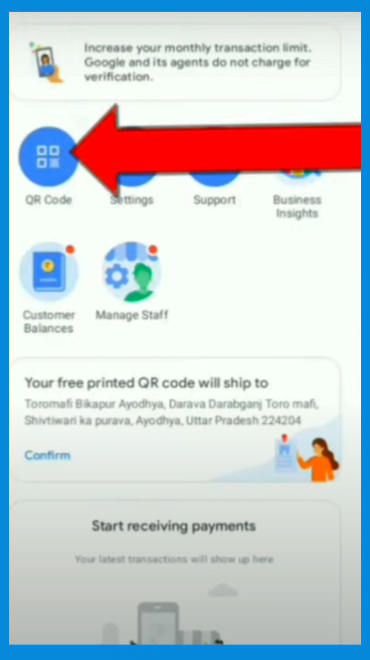
- When you get the approval of Google Pay Business account, the option named Your Free Printed QR Code appears on your home screen itself. You just have to click on this.

- As soon as you click, it will show you the address you have entered, which you have to check once. If you want to make any correction in this address, then you can edit it by clicking on Edit Address.
- After verifying the address, you need to click on Confirm. In a week or two, this QR Code is delivered to you by post, for which you do not have to pay anything.
Apart from this, friends, if you have ordered your QR Code and in between you need a QR Code Or you do not want to order your QR Code but want to save the QR Code in your mobile, then you can do that also through this app.
For this, whenever you open this app, you can see a QR Code option on its home screen, by clicking on which you can see your QR Code Or you can share it with someone and apart from this you can download and keep that QR Code in your mobile as well. With this, whenever you want to take payment from someone, you can receive your payment by scanning this QR Code present in your mobile.

All the money transactions that you will do with this account will be visible on your home screen. Friends, if in future you want to make any change in your Google Pay Business account, then you can do that also through this application, like if you want to change your mobile number, bank account number, language etc. You can edit by coming to the settings in the app.