Friends, as you all know that we can make online payment in two seconds without entering account number using UPI payment system and this service is operated by the government, so it is very secure and fast. If you have not adopted the UPI payment system yet, then you must register yourself in UPI today itself.
We can also use the UPI payment system using the government’s official app BHIM and apart from this, NPCI has also provided the technology of UPI in a secure way to these third party apps like Google Pay, PhonePe, Amazon Pay and Paytm. . That’s why you can adopt UPI payment system by using these third party apps. All these third party apps are connected to the UPI. UPI is transforming digital payments all over the world and it is also being globally accepted.
If we use UPI method for online shopping then we need UPI ID for that. Along with this, if we want to invest online in our mobile recharge, SIP or IPO through UPI or make payment at a shop, then also we require UPI ID. The opposite is also true, that is, even if we want to order money from someone online, we still need a UPI ID. Friends, UPI ID has a huge role in the UPI Payment System and without it, this system does not work. .
So today in this article we will know that how can we create UPI ID using third party apps like PhonePe, Google Pay and Paytm? Now we will see how the UPI ID is created in all these third party apps one by one –
How To Create UPI Id In PhonePe?
Multiple options are available to activate and create your UPI ID in the PhonePe application, but out of these, we will tell you the easiest method.
- First of all you have to log in to your PhonePe application dashboard.
- By the way, when you activate the PhonePe application and link your bank account with it, it creates a By default UPI ID for you and it also sets your default UPI ID, which you will see on the home screen of your PhonePe itself.

- Now you have to click on your profile on the left side and after clicking, all your bank accounts linked to PhonePe will appear in Payment Methods.
- Now for any bank account you want to activate UPI ID, you have to click on it. Here you can manage many things of your bank account and you can also check the balance of your bank account.
- For UPI ID, you will get the option of the lowest UPI IDs. Here you will see three UPI IDs of PhonePe application. Now PhonePe has Tie-Up with three banks. That’s why it gives the option to activate the UPI ID of these three banks.
- Now here you can activate any of these three UPI IDs. You can activate any one of these UPI IDs or you can activate all these three UPI IDs as well. The more you activate UPI IDs, the less are the chances of your Transactions failing.
- Apart from this, you can also create your favorite UPI ID here. Below this you will see the Prefix of these banks, by clicking on which you can create your favorite UPI ID.
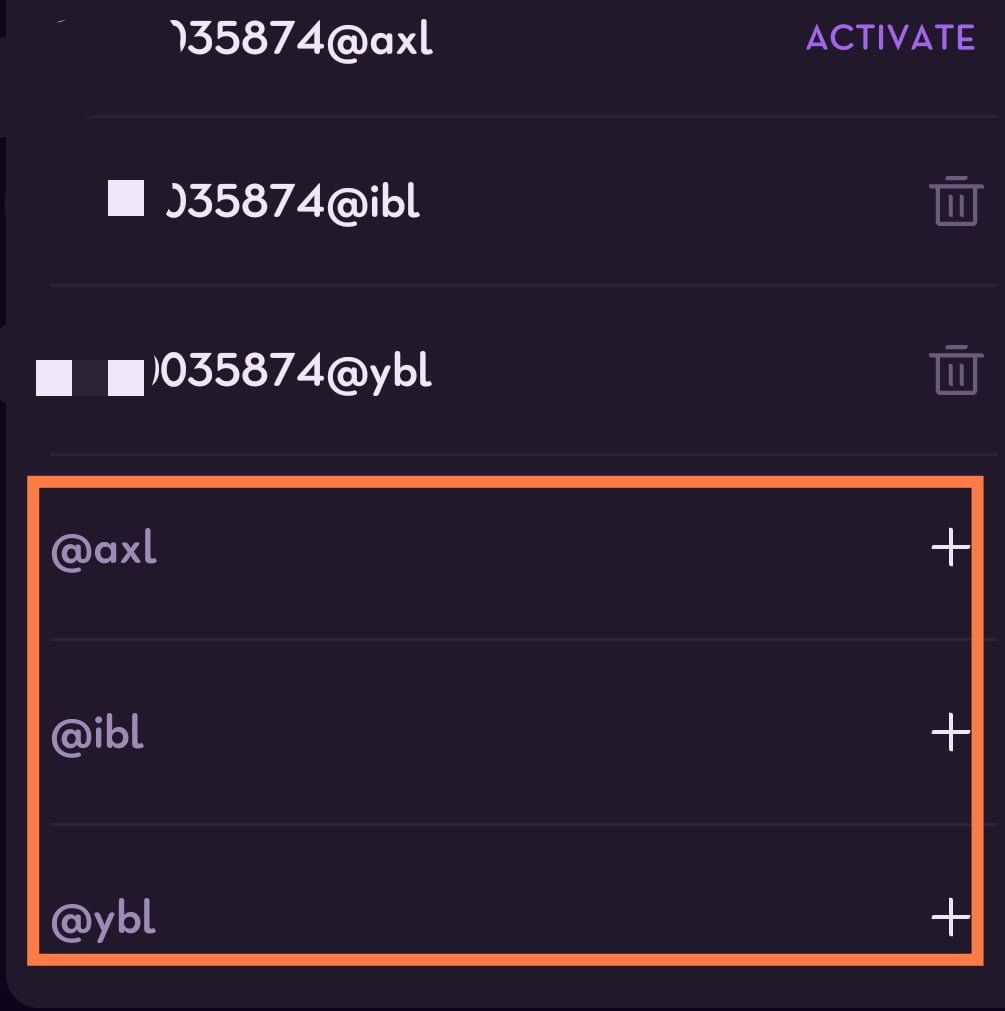
But while activating UPI IDs, you have to keep one thing in mind that whatever mobile number is linked to your bank, it should be in your same device and it must have SMS recharge, because while activating the UPI ID, an SMS is sent for verification from your phone number. And your UPI ID is activated on the same base.
How To Create UPI Id In Google Pay?
To create UPI ID in Google Pay, you have to follow these steps –
- First you have to open Google Pay and verify it with the mobile number linked to your bank account. And if you have already verified, then you have to login by entering your login pin.
- Most of the third party UPI Apps show you your UPI ID on your home screen itself but in Google Pay the UPI ID is not visible on your home screen. For this, you have to click on your profile in the upper right corner.
- As soon as you click on the profile, all the bank accounts you have linked from Google will be visible to you here.
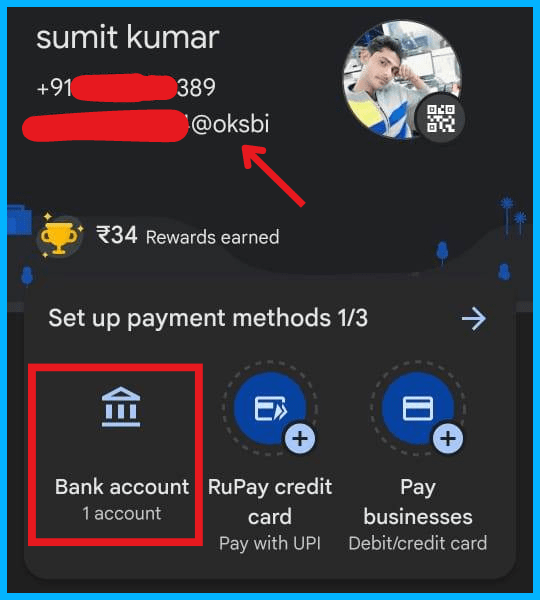
- Now to activate your UPI ID, you will click on bank accounts and select your bank account for which you want to activate or create UPI ID.
- After this, many options will come in front of you, so that you can use your Google Pay account in a better way. Here you have to click on Manage UPI IDs.
- Now Google Pay has tie-up with four banks and Google Pay creates UPI Id of these four banks. These banks are as follows – Axis Bank, SBI Bank, HDFC Bank and ICICI Bank.
- Google Pay sets any one of these four UPI IDs as the default UPI Id for you, which you can change from here as well. You can activate any one of these four UPI IDs.
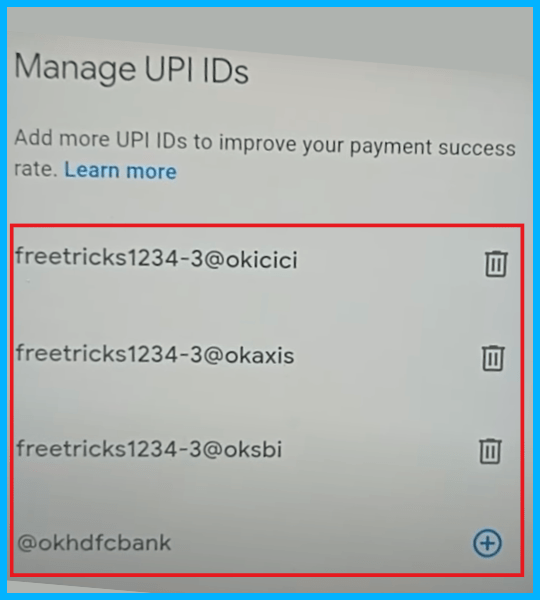
- Google Pay recommends that you activate all these four UPI IDs as it reduces the chances of your Transaction Failure.
Google Pay does not give you the option of creating a custom UPI ID like Phone Pay. You can activate only these four UPI IDs in Google Pay. Google Pay mostly uses your email ID and the prefix of the bank in the last to create these four UPI IDs.
How To Create UPI Id In Paytm?
Friends, the process of activating and setting UPI ID inside Paytm is different from all other apps. No matter how many bank accounts you add inside Paytm, the same UPI ID is set for all of them. In this, you cannot set different UPI IDs for different bank accounts.
In this, Paytm shows you 4-5 UPI IDs using your phone number and your name, out of which you can set the Primary UPI ID of the one you want. By the way, two UPI IDs remain active inside Paytm, out of which one UPI ID is primary and the other UPI ID remains active but it will not be visible to any other person except you until you share it with someone.
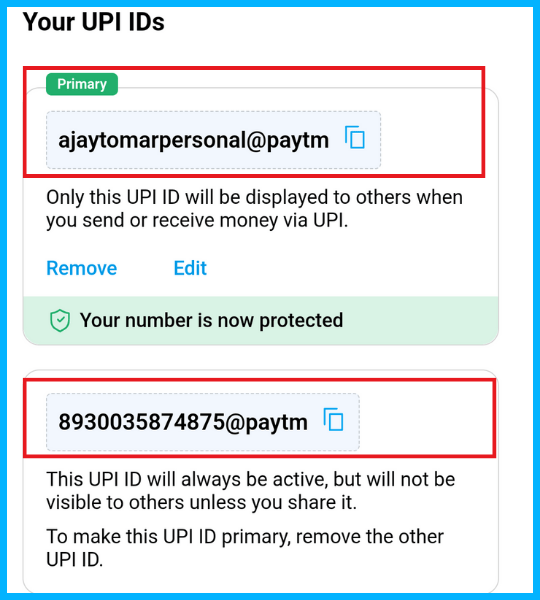
All the transactions that you will receive or send money from this primary UPI ID of yours should be done from your bank account which you have set up Primary Bank Account within Paytm. This is a simple process in that your primary UPI ID works with your primary bank account.
Let us know how we can create UPI ID within Paytm –
- First of all, you have to log in with your bank linked mobile number inside the Paytm app.
- After logging in, you can add your bank account in it at the same time and later you can add it by clicking on your profile by coming inside the Paytm app.
- After adding the bank account, you have to set the Paytm screen lock which you can set according to your own.
- After this you have to click on your profile in the left side above and click on UPI & Payment Settings.
- Here you will find many options to customize your bank accounts and your Paytm app, which you can use as per your need.
- You have to click on Other Settings – Manage UPI IDs and here you will have a UPI ID already set as Primary. If you want, you can change it by clicking on EDIT or you can remove it by clicking on Remove.
- Here as soon as you click on EDIT, four UPI Ids are shown in front of you from Paytm, from which you can choose any one.

- Second Secure and Hidden UPI Id will be visible to you below the Primary UPI ID, which is always active.
How To Create UPI Id In Amazon Pay?
Let us now know how to activate UPI ID on Amazon Pay-
- To activate UPI ID on Amazon Pay, first of all, make sure that your Amazon Pay App is updated.
- Open the Amazon app, you will see Amazon Pay option on its home screen itself or you can also find it by clicking on the bottom menu option. You have to click on any one of them.
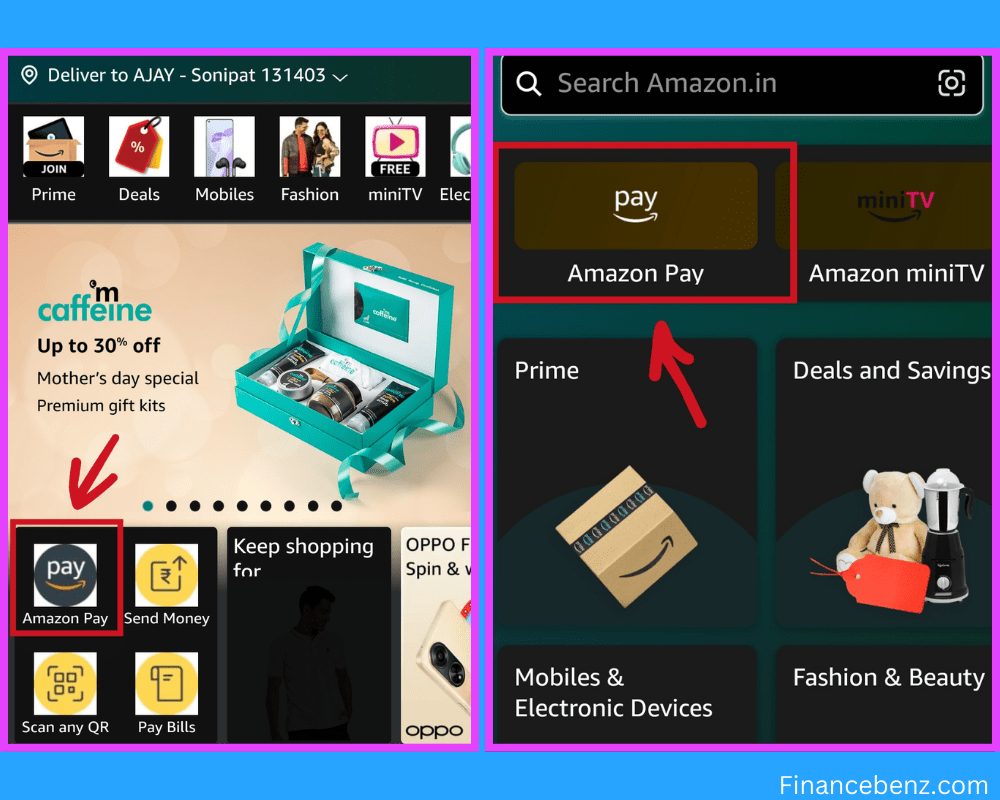
- After clicking, you have to login with the mobile number linked to your bank like all other third party apps. For this, keep in mind that you must have SMS recharge in that mobile number which is linked to your bank account as your mobile number will be verified by this.
- Now you will see the option of Amazon Pay UPI on the top, you have to click on it. Here you can manage all the services of your Amazon Pay UPI.
- All your linked bank accounts will appear here. In this also you are given the option to create different UPI ID for all bank accounts. In this, your mobile number is used in the automatic default UPI that is created.
- If you want to clear the UPI ID for your bank account from your account, below that you have to click on the option of Manage UPI IDs.
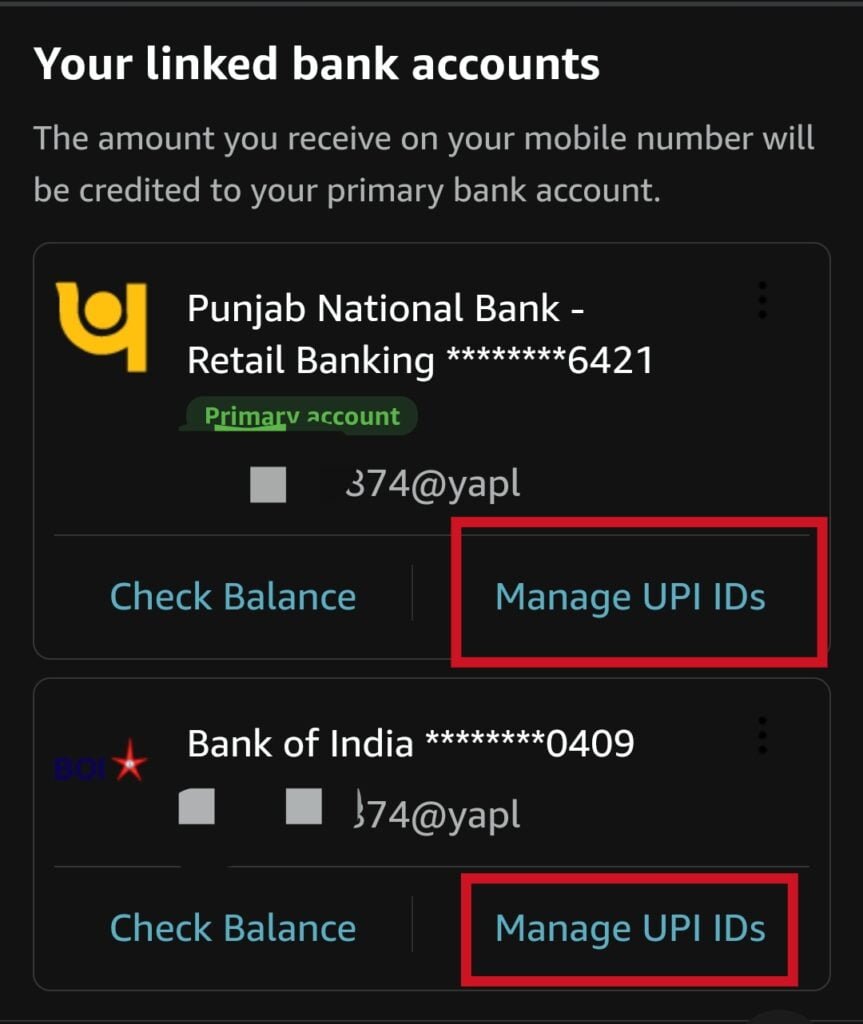
- Here you are given three default UPI IDs created by Amazon Pay, out of which you can set any one as primary. Apart from this, you can also create two custom UPI IDs here, in which you can enter your favorite name.
- You can activate any UPID out of these five UPI IDs or you can activate all these five UPI IDs as well, which will reduce the chances of your transactions failure.
Amazon Pay also has tie-up with three banks and it creates UPI ID of these three banks. These three banks are as follows – Axis Bank, Yes Bank and RBL Bank. In which APL Prefix is used for Axis Bank, YAPL Prefix is used for Yes Bank and RAPL is used for RBL Bank. In Amazon Pay and PhonePe, you are provided the facility to create custom UPI ID.
Final Words:
Friends, I hope you got to know a lot about UPI and UPI third party apps from this article. If you want to increase your acceptance of digital payments, then you can create your ID in every third party UPI app. After this, even if you uninstall that app, you can still receive payment through that app. This money will be credited directly to your bank account. If you find this information beneficial then do share it.